Showing posts with label Professional Toolkit. Show all posts

Monday, 23 February 2015

Studio Shoot - Process and Final Evaluation


I haven't post anything regarding the studio shoot because I hadn't done things that I wanted to write about, until last week. 

But, the time has come and I'm gonna write briefly about them. 

As you can see on the following pictures,  the beginning of this project was all about building the set. 
Building, glueing, flooring and painting. 


After the set was built my roll as a sound recordist was pretty straight forward. The only thing I wanted to make sure was the type of microphone I was going to use. Therefore, I asked Anne to book
 the Rode NTG3 microphone instead of the NTG2, which is  what DFSA students would normally get. 

On the actually shooting day, my job was to find a good place to stand, and hold the microphone to get clear sound. Because the microphone was connected to the camera, and not a audio recorder, I asked people to help me monitoring the audio levels.

Wildtrack - That was another thing that I kept in mind the whole time. So, after we finished the scene, the crew kept in silence for about a minute, so I could record the ambience sound (wild track). To be honest, we weren't that quite, which gave me extra work in post, but I come to that later.

In addition to that, during the shooting, there were a lot of noises (camera dolly, people talking, steps). Because of that, after we finished shooting, I've asked to record some folly (foot steps and the sofa rubber) , while we were still in the studio.


POS Production

After I was sent a edited version of the film, I then started working on Adobe Audition to assemble sound. 

Open a New Multitrack Session and choosing a destination. From the begging I've being told to keep my projects organised, I reckon I've being doing that in ever single project don't matter how small it is.


Importing files


Enabling Video Window


Rearranging the Working Space


Because I knew I was going to need to work in the Waveform editor, I made a copy of my file using 'Convert To Unique Copy'. This is because, the waveform editor uses destructive method.


'Cleaning up'  the wild track - As I said before, the wild track should be the ambience sound only, but that didn't happen. Therefore, I had to use the Healing Tool in the Waveform view to clean up all the noises.

BEFORE


AFTER


The last thing I did was to record the narration for our film, that wasn't too hard. I got the Marantz audio record and the NTG2 Microphone. Joshua gave me a big hand and accept to have his voice recorded.
Beforehand, I had asked Thomas, who was the director for this film, to give me some reference of how he wanted the text to be read.
He sent me this video:


Joshua gave me a big hand and accept to have his voice recorded


Audio Narration 


Final Evaluation 

Working as an audio editor/recordist wasn't something particularly new for me and because of that  I didn't have much problem to play these roles. However, regarding sound, I would like to have contributed more in the final process. I believe that we, as a group, should have adopted a tighter schedule to allow everyone, who was part of the pos production process, a fair amour of time to work on the piece.

The process of building a set is not something I want to do again. But, I can see how the experience can be beneficial for those who want to improve teamwork or even DIY skills. But, it is a process which one have to follow instructions that had been decided beforehand; hence, not a very creative role.




Sunday, 22 February 2015

Avid #02

Editing section 20/02/15

After finishing to assemble the clips and fine editing them, it was time for sound mix, titles and output.
To avoid any fatal error I decided to create a new sequence, copy the assembled clips and past them in the new sequence.


Mixing Audio
First of all, active Wave form view in the sequence, that gave me visuals of the audio.

Secondly, I changed my working space to optimise my work flow: CTRL + 1 or Tools > Audio Tools


 1- I used clip gain and audio crossfades to create smooth audio edits and audio levels. To adjust gain, I have used two different ways.
 
     IN/OUT in the sequence > fast menu in Audio Mixer> Adjust Pan/Vol On Tracks -In/Out
    In Bin > select the master clip > right click on it > choose apply gain


The second method might be a faster way to adjust the gain, depending on the type of project you are working on. In my editing for Silent Woods, I was using different clips taken from one unique master clip. For these clips I adjust the gain using the second method.
For the other clips, as they were being used only once in the sequence, I decided to edited them using the first method.


I used crossfades between two clips where sound were too discrepancy. However, for some  clicks/pops that could be heard it was better to use another method in order to get rid of them.  For these cases: trim mode > space bar (play) > hold Q or W (to play only the left or right part). After that it was ease to choose a appropriate manner to fix the problem.

2- I applied audio keyframes to fine-tune and to solve specific sound issues.

Audio Data > Volume > ' (to add keyframe)
For this project, I used keyframes in a specific clip that had background noises . I lowered the volume in the part where the noise was,  and layered the 'wild track' in a track underneath it, to cover the 'silence'.

Adding Keyframes 

Titles
I didn't want to spend hours working on titles for this exercise, hence I kept it simple.
To open the Title Tool: Tools > Title Tool
Creating titles (not the marquee one!) were not rocket science, pretty similar to Premiere Pro.


Exporting 
I wasn't sure about this one and it took me some time to find out how to export a  'DNxHD 185 QuickTime' file.
This is how I did it: Select the sequence > Files > Export > click on Option > click on Custom > Format Option >** with Video selected click Settings > in compression type choose Avid DNxHD Codec > in resolution choose DNxHD 185 (and the frame wanted frame rate).

** select Sound to adjust its exporting options.


Avid #01

Editing Section 13/02/15

An option that can be handy in the future: Creating an Assembly Sequence
In the bin containing the master clips, click Text View > Ctrl +Shift +N to create a new sequence in the same bin > choose the clips (in order).


Opening a bin from another project - Project Window must be active.


Adding audio tracks: Ctrl + U (mono) + Shift (stereo)

Visibility Waveform: Track selector (on the right of the Timecode) -
View: Ctrl + Alt + L (enlarge) / Ctrl + Alt + K (smaller)

 Splice in: "V"

Keep Sync: keeping all the tracks synced can be a challenge in Avide, especially when working in the Trim mode. In order to void loosing sync, one must enable all the tracks.


The lift button: removes material from the time line leaving filler in its place: IN and OUT point > select the Tracks > Press 'Z'
Extract button: removes material and closes the gap: IN and OUT > select the Tracks > press X

Trim Mode: it has being, without a doubt, the 'tool' which I enjoyed the most. It let me fine edit my sequence without taking my hands off the keyboard: 

'U' to activate and deactivate the trim mode >

P : A-Side Trim 
[ : Dual Roller Trim
]: B Side Trim 

A : go to previous edit 
S : go to next edit


M  : Trim 8/10 frames Left
,  : Trim 1 frame Left
.  : Trim 1 frame  Right 
/  : Trim 8/10 frames Right

In the Trim Mode, a good option for a quicker edited is to use the keys J K L. They allow you to trim while watching the footage. 

* While using the Trim Mode it essential to pay attention whether the Ripple Trim is selected or the Overwrite Trim. 

Add Transition: \ 


Tuesday, 10 February 2015

Avid Final Evaluation


Learning Avid has been painful, but not as painful than having to blog about learning it.
Like any other editing software, one have to practise in order to master it. Of course, the "Avid book" has helped as well as Lynda.com. 

I've chosen Silent Woods as my outcome exercise for this unit and to be honest I've been struggle with it. Not only I'm editing in a software which I haven't got much knowledge about, but also I realised how bad I am when it comes to actually editing a film/tv series.

My previous editing experiences were on projects which I was part of the whole creative process and not just the editing.  In ddition to that, it's right to say that the material that I would normally edit is  different from Silent Woods. I am not use to edit multi camera dialogue scenes.
It i true, thought, that I could have chosen to edit my Maps & Journeys' project and have that for assemble outcome.

Always keep a backup of your rushes.

Anyway…

I've been thinking about why I've being struggling to edit Silent Woods. , I believe that I've been lacking a critical eye, on the editing, when I watch pieces like it. On the other hand, to be honest, I'm pretty sure that I'm not enjoying editing it. This scenario might change in the future and I'm happy I'm giving it a go.

Moreover, to use Avid has been a very positive experience. Firstly, I became in love of how fast one can edit on it, regarding all the short cuts and the fact that using two hands on the keyboard is extremely practical. After this first contact with Avid, editing on Adobe Premiere just feels amateurish and imprecise. Secondly, knowing Avid - or at least having general knowledge of how to work on it - might be useful if I decide to work in the industry, regarding the fact that Avid is used by major production companies.


Thursday, 16 October 2014

Protools #3 - Building my soundscape + evaluation

My idea for this project was to use different sounds that, anyhow, would have a connection with each 'sentence' of the text. Money by Pink Floyd has inspired me on this project and that can is made clear with the use of 'PAN' during my soundscape. By doing that, I believe to have added a musical rhythm to it.

Compressor/Limiter was other tool that has help me to improve my soundscape. Basically a compressor reduces the dynamic range and that has allowed me to amplify the audio further without getting any clipping.

After placing the sounds on different layers, I felt that something was missing. This is because, there were times, between one sound and another, that nothing could be heard apart from silence. So, I've decided to extended the 'heart beat' to last to whole piece and not just for 3 seconds, as it was intended. The 'heart beat' was actually recorded by placing the microphone against my chest. As you can imagine, it didn't come up as the clearest sound. Because of that, I had to use the EQ tool; in order to improve its sound quality, firstly, I had to find the heart beat frequency and to increase its gain. After that, I lowered the high frequencies' gain. 


Another issue that was concerning me, was the fact that the piece sounded 'flat', and thus I use the Reverb tool.

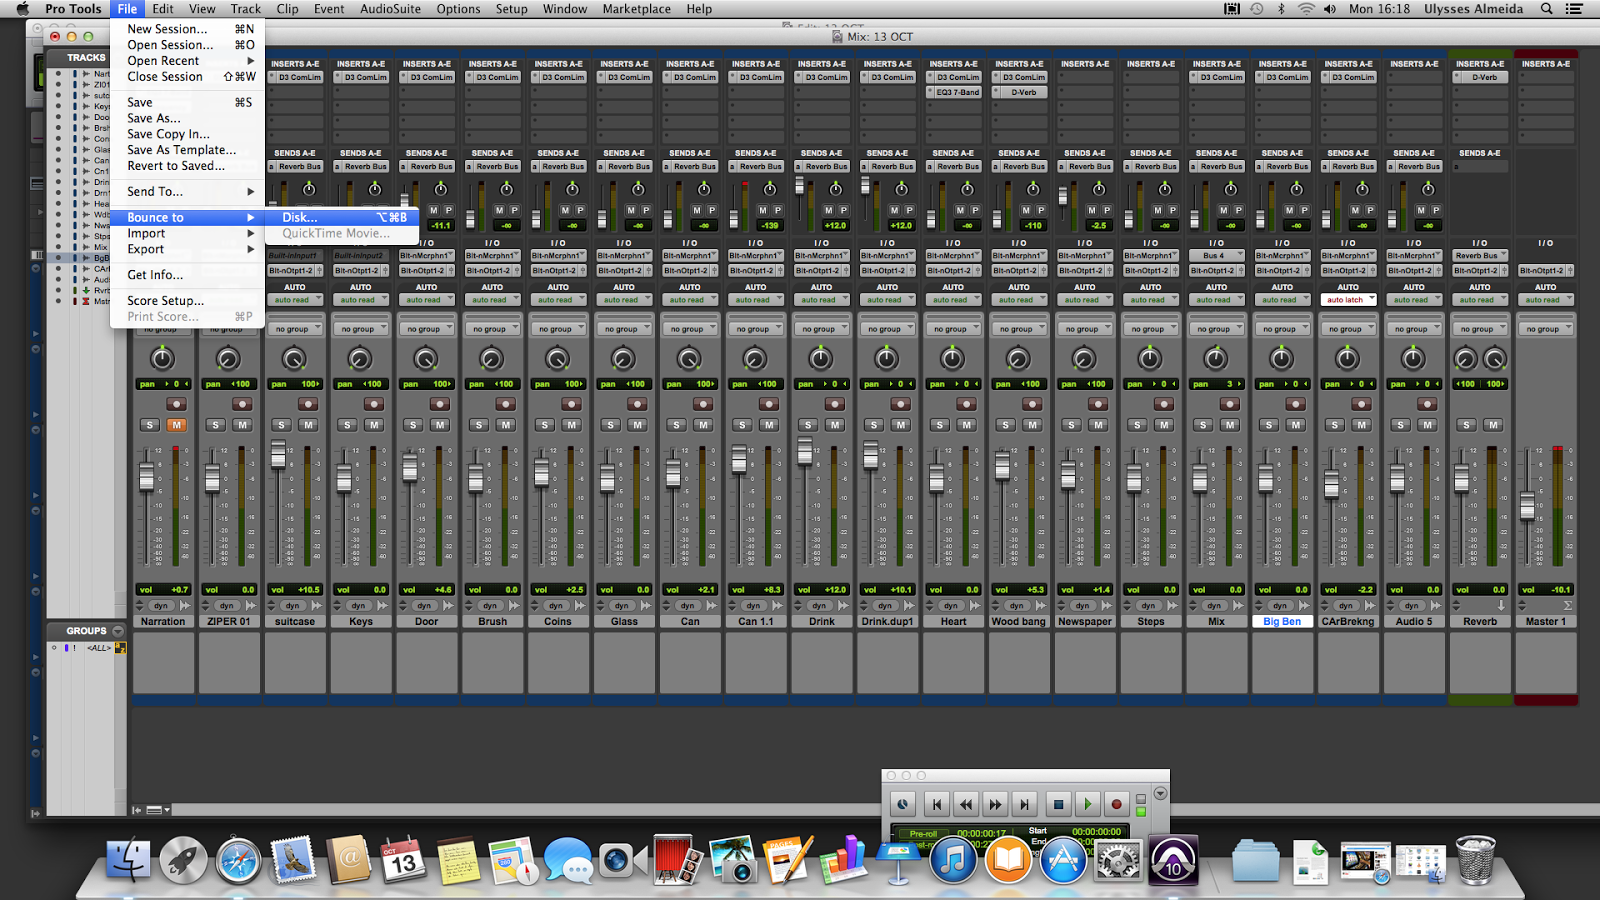
After getting all the levels right…

…it was time to 'bounce' ('export')


Finally, Protools was completely new to me and I feel that most the subjects covered in this unit had already been taught last year (Adobe Audition); microphones partner, audio waves, levels and compressor tools are an example of such subjects. However, reviewing some topics, did give me more confidence to use and working with them. Working as 'sound technician' is not a path that I want to follow, nevertheless its learning its never a waste. My short experience as a videographer, has shown me, the importance of good sound in videos/films. Since last year, after my first contact with Adobe Audtition, all my major projects have had the benefit of having good sound. 
The major advantage of learning Protools is the fact that I now know one more software, which increases my expertise. Different 'companies' use different softwares and knowing as many softwares, as possible, even if it's in a basic level, give me the confidence to work with them in a professional level. That's because, I know that with the knowledge I have now, I can 'easily' improve my skill.

Protools #2


Having some experience on recording sounds, using a mic and a audio recorder, made this task relatively easy to accomplish. When recording, my biggest concern was not to get unwanted noises such as, background, handling and wind. In order to avoid handling and wind noises, Ive use a microphone shock mount holder and a windshield.
windshield 

shock mount


Having recorded all the sounds I wanted, it was time to start building my soundscape on Protools.
There were, however, two sounds which I could not recorded myself and I've decided to get them from the BBC Sound Effects CD (found in the Uni's library), theses sounds were: Car breaking and the Big Ben.
Having recorded all the sounds I wanted, it was time to start building my soundscape on Protools...

Tuesday, 14 October 2014

Protools #1

PROTOOLS

29 SET 14
Task:
·      Pick a short assignment (30s to 1 min) text
·      Record sounds, using the Marantz audio recorder, in order to build a soundscape to this text.
·      Use only the following effects on Protools: Reverb, Cutting, Pitch Shift, Reverse and Distortion.
·      Two versions: soundscape only and soundscape + narration (text)


Marantz audio recorder
 There are not many differences on how to set up this recorder when comparing it to the Zoom (recorder used last year) . But there are some settings which are always important to remember:

Rec Format: PCM 16
Re Channel: Mono
Pre Record: OFF
6db is the advised limit


Protools
In my opinion Protools and Adobe Audition have various similarities. And as I’ve used Adobe Auditon before, it’s just a matter of finding where are the tools I need on Protools.


-- Short Cuts
 Cmd E > extract     
Cmd ] or Cmd [ > Zoom in/out
Cmd = > Mixing window (bus)

-- Settings
PMC-16 is the actual data the recorder made 
AIFF contain extra information (meta data) 
BWF contain even more meta data, which is a data (information) about the             recording.


 Chosen text

WE LEFT OUR FAMILIES
WE ABANDONED OUR HOMES
WE WORKED FOR NOTHING
WE SLEPT ON FLOORS
WE PARTIED HARD
WE LOST OUR MINDS
WE DANCED WITH THE DEVIL
WE FACED OUR FEARS
WE SWALLOWED OUR PRIDE
WE GAVE OUR HEARTS
WE TRIED AND FAILED
WE FOLLOWED OUR DREAMS

WE ARE LONDON
WE NEVER DIE !

 I found this text online, on someone's Facebook page
  
SOUNDS (TO BE RECORED)
SUITCASE ZIPPER AND DRAGING
DOORS CLOSING
SWIPING FLOOR AND COINS
NEWSPAPER AND FLOOR
ICE
CAN BEING OPENED
CAR BREAKING
THUNDER
STEPS
HEART BEATING
THE BIG BEN